Showing posts with label #KidsCraft. Show all posts

Have you created masterpieces with the creativity clicks of K'Nex?

I always thought K'nex had been around forever, and a little pang of jealousy hit my heart that I never had the chance to play with these amazing interlocking rods, blocks and gears, until I found out that it has only been around since 1992, and seeing as I pre-date the internet, I feel a whole lot better about sharing the K'nex experience with my son.
#Gifted

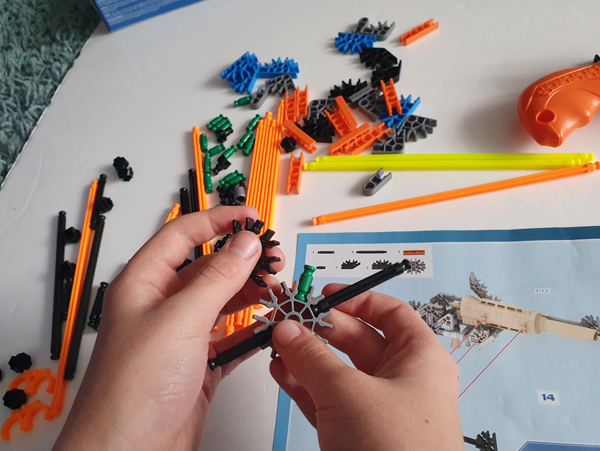
9-year-old building a Battle Bow from K'nex

K'nex supports the development growth of fine motor skills, manual dexterity, and spatial awareness enabling greater understanding of STEM subjects.  These make great toys for all the family to get involved in and share.

Colour in and wear your own T-Rex head

#Gifted
Many little ones love a dress-up, well, in fact, many of us older ones do too!  So what better way to add to the fun than to purchase a character head not only to wear but to colour in and assemble.  Truly embracing the Fandom world of making/wearing costumes.

Dino Head, coloured in and assembled to be worn over the head

About Fiesta Craft's 3D Card Crafts

Fiesta Crafts have exciting build-your-own craft sets that will keep children entertained for hours! Not only do they get to build their own toy, but through that process, they get to understand how it all fits together. Then, they get to play with the toy, proud of having built it themselves! 

Review of beautiful miniature 3D model kits

Brainstorm has launched more lines to their popular and sustainable EUGY collection, and we absolutely adore them!
Made from environmentally friendly, biodegradable card with natural eco-friendly ink and non-toxic glue, these are a great gift for children to get involved in.

Creating Busy Bags for kids


Joining in with Alice's linky 'LIML', I thought I would share with you this week the craft items that came through the door.  I received various pieces that I had ordered to create busy bags for my son.

I had seen a video clip on my Facebook page from an American crafting mummy who had created these busy bags for her children (I would add the link but I see a lot of craft videos on my page and I can't currently find the one I want).  Unfortunately, the folders used for the busy bags were in America and when I finally sourced them here - they were over £25 for 4!!  That's not happening!

How To Build A Blanket Fort With Your Child

Time4Sleep, a bed and furniture company, is aiming to build the biggest blanket fort this August.  The event will take place on August 29th in Leeds, with the hopes of breaking the current world record.

How to make a quick and easy Easter game for Fundraisers

I wrote how we'd made a few games for my son's school to help them raise much-needed funds for the school.  The fates and events held at the school hosted via the PTA are so important due to government cuts and schools struggling to keep their Teaching Assistance staff, Support staff and non-core subjects going!

Last year, two parents were completing a run for the MS Society and the PTA decided to put on an Easter Eggstravaganza event on the last day of school with 50% of monies raised going to the MS Charity and 50% going back into the school fund.

We raised over £559!

How to use Polymer Clay thanks to JewelleryMaker

On the 14th August JewelleryMaker launched 16 new DIY Jewellery making kits! These range from DIY How to, DIY Personalised to my favourite DIY Kids Craft.

What you will receive in the DIY Kids Craft Polymer Clay Jewellery Making kit

JewelleryMaker Kids Craft - Polymer Clay Kit

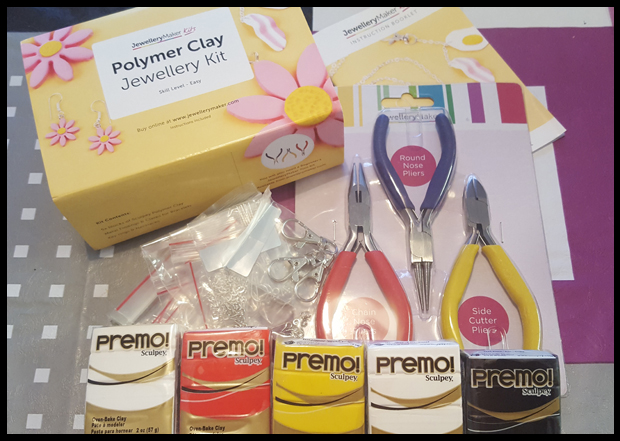
JewelleryMaker have put together a fantastic DIY Polymer Clay jewellery making kit which is ideal for kids and well the whole family really!  The kit contains 5 polymer clay packets, jewellery making accessories, instructions and links to video tutorials.

Although marked as Kids Craft, this is in-fact a family kit.  The jewellery to make are not just necklaces and bracelets, but also key-rings and buttons.


What we made with our Polymer Clay Kit

As you can see from the photo above we had a lot of clay to play with. To start us off we used the instruction booklet to create the panda and egg and bacon key-rings.  I say we, and by that, I mean the whole family.  All three of us got involved in this project and it was great family time.

There is no limitation to what you can make, just a little bit of skill and guidance.  I even used my phone to pull up a template and we made the images straight on the screen to make our Pac-man charm bracelet!

making Fandom jewellery with JewelleryMaker Polymer clay kit

How to get the Polymer Clay Kit for the family to enjoy

If you pop over to JewelleryMaker you will see various Polymer Kits including the jewellery kit that I've featured here today.  Also until the end of September 2017, I have a special code for you that will give you free p+p AND the free tool kit if you purchase this set.

So what would you make?  Please tweet me or leave a comment below if you do decide to take up on this offer and show off what you've made, I quite fancy making a Tardis...... oooh watch Instagram for my next polymer piece!

Use promo code CraftsOnJM to get a free Tool Kit from JewelleryMaker.com


I received the Polymer Clay Kit from JewelleryMaker.com to review.
The above wording is all my own and not influenced by products received.


It's time for Back to School - Kids Craft Challenge

Back to School kids craft challenge to help them spell

For this month's Bostik Blogger craft, the theme was Back to School!  It's hard to believe that my son has just finished the reception year!  I have no idea where that time has gone and I'm still not accepting that he's even a schoolboy.

So with that being said, I was a little surprised he came home with summer homework!  The children have been given a list of words to focus on over the summer and try and spell or read as many as they can ready for Year 1 in September, so I took this opportunity to turn the Back to School theme into a little challenge for him.  My kid loves a puzzle!

We have always used learning through play, such as counting up to 12 on the dice or counting spaces on a board game.  Using Lego to count out bricks needed for creation from Pinterest to using exercise books and Reading Eggs to trace letters.

As the emphasis has mainly been on numbers in our house, I took this month's Bostik box as a chance to enhance his spelling by using the Scrabble tiles supplied.


I took his spelling list and picked out words I know he either needs to focus on or needed help in getting started on his Scrabble craft challenge.  Now, not all the letters were in my box, but fortunately for me, I had a whole load of Scrabble stickers that I'd bought in one of The Works many 'clearance' sales.

For older children, this would be fine to leave as is.  Ask them to see how many words they can create from their tiles and stick onto their card, but as my son is only 5 he needed a bit of guidance as to where to place the tiles.

I set the tiles up and then marked the spaces out.

marking out the scrabble tiles for a back to school kids craft challenge


Bostik Foam pads were added to the back of each tile so Max can save his work and review this until he's comfortable spelling the words, the aim is to replace the tiles over time with new words and the sticky pads work great at pulling off the tiles without tearing the card and replacing with new ones.

Creating a scrabble craft project to help children learn to spell

Challenge was accepted and with a little guidance, the task was completed in no time, so much so that he's asked if we can do another one next weekend.  I've told him that next weekend as he did so well with this challenge, he can create the board himself!  He was very excited about this!

Working out which letters go on his new scrabble card

Working out his scrabble board for kids craft project


Looks like we'll be buying Junior Scrabble before long!

Creating a beautiful Butterfly forest with your child

I am so pleased to announce that we are back with the Bostik Bloggers, and our first assignment for July was to create a nature theme with the materials that we were sent from Craft Merrily.

As the theme was nature, I took Max out to our local woods to pick up some twigs, as I had planned to put his artwork in a twig frame.... but we went off on a tangent.... as usual.

Armed with our twigs, fabulous coloured foam and felt materials and Bostik's Blu-tack & foam pads we were ready to make our butterfly and bug garden.
What we used creating a 3D butterfly forest

We have a box of craft bits for such an occasion.  For each visit to Hobbycraft, the Works or brands sending us samples the left overs are stored in my son's craft box and half the fun in creating a new project is rummaging through what we already have, hence our butterfly picture turned into butterfly, bug, frog and forest scene.

I highly recommend a craft storage box.
Get a kids craft storage box, they will love having a rummage in here whenever a new project is proposed

Talking of boxes, my son made his butterfly scene in the box.  What a brilliant idea (minimum mess).  I cut the blue and green felts to size and lets him decorate the blue sky with a sun, bees and butterflies and the green foam with caterpillars.

Once completed I used the Bostik foam pads to stick the scenes inside the box and then put the whole thing on its side to begin the 3D effect.

Creating a sky scene using Bostik foam pads and blue felt

Crafting in a box is a great way to minimise mess

He created a pond on the floor complete with a frog and we used the twigs as trees.  The decoration on the trees were held in place with the foam pads, which are amazingly sticky and hold firm!

The new trees were then held in place using the Blu-tack and covered up with "grass".

Taking care to add each blue pompom to his pond

Green tissue paper makes great grass effect

The whole craft project was rather mess-free if I'm honest.  We have various tablecloth covers which I purchase for £1.99 on Amazon, usually add-on items and these last until we've used paint so as this project was a minimum of mess, this cloth's good for an another project and seeing as we're now in the school holidays - I feel that will be very soon.

I'm really pleased with his efforts on this project, he's only 5 and started school last September and I do believe it's his interactions at school that has unleashed his creative side.


How to create kids Detective crafts


The secret book

Oh well, this was way more difficult that I ever imaged.  Always is with me though, get a book, cut a few pages out - job done.......not!

Get a book - well I ended up going to the charity shop to purchase a hardback book as I could not bear the thought of cutting anything I owned.  When I was in the shop I did feel a bad about buying the one I did!

I then measured out the first page to see how much I wanted to take out the middle and proceed to cut through the pages. I'd take out the middles of the page and as I got near the last cut page I'd re-score the next set of pages to 'try' and keep the same measurements - It kind of worked.


I found myself pegging the sheets together as they'd been cut as it starts to get a wee bit fiddly as you get further along with just the outlines of the pages to work with - to the point I was rather glad I didn't choose a thicker book!


It took some doing too!  Once I'd had enough.... I put my cutting mat under the last page I wanted to take the middle out of so as not to score the remaining pages - not sure why I did this - in hindsight don't think it matters!

Armed with my Mod Podge I glued each of the pages together - oh yes I did, and I did that in two sittings!  Just a dab.  I don't advice just glueing the sides, it's prone to opening at random pages if you do!


Once the glue had set I trimmed the inside edges and sanded them slightly to make them smooth - not dead straight and in line - but they are smooth and bingo - hiding place for the iPod......or T-Rex apparently.


Looking Glass

This is possibly my son's favourite I think.  We got an empty lemonade bottle and used a couple of old bangles to mark circles on it.  I placed one near the neck and one on the body to see which looked better cut out.


We've used both but I do prefer the cut out on the left which is from the neck of the bottle.  We glued a stick to the plastic cut outs and left to dry.  Once set we covered the sticks with tape - this was mainly to cover the plastic to give it a smoother finish.


Binoculars

My son had left me half way through this one so I've left in part finished state.  Obviously, there is a world of choice with decorating these and such fun!

We got a couple of toilet rolls (well quite a few really as he tried to eat one of them and I still don't know what happened to the original blue one!) and quite simply decorated them.   'We' chose glue (favourite craft item of the month at the moment....) and tissue paper.


Once the rolls were dry I glued them together, added a hole on each side and threaded through a long ribbon.  Although he wondered off after he'd decorated his tubes he loved the finished product.  Nice and easy craft for all to get involved in.


We then donned the Sherlock Holmes outfit and went looking for ........ bugs.


I do love craft days with my boy

How to create a dreamcatcher

How I created a dream catcher

Back in the days when Max was just a twinkle in his daddy's eye, we took a trip of a lifetime and travelled Route 66.  Along the way, I bought a beautiful little dream catcher.  To this day it is one of my most treasured items, so when my son took a big shine to it and asked to have it in his room, I gave a little smile and said maybe!
my original dream catcher

I know how that sounds, but he's 4, and with all the best intentions in the world, 4-year-old hands, idle or not make their way around things, in things and oh, broken things.  So I hung up my dream catcher in his room, then I came across this infographic on Pinterest!!

(The actual image is much larger when you click through).

So I figured I'd get Max to help me make one for him (and yes, so I can swap it out for my little one).

I bought the rings off eBay, but have since seen that The Works actually do a complete dream catcher set!

I then gave Max the task to keep an eye out for any large bird feathers that he comes across on his travels, and with much pride in himself, he came home from the park the other day with 4 large black ones and a white one.  We gave them a good wash up and left them out to dry.

Max picked out his ribbon to cover the ring, and I set about wrapping this around - oh my goodness, it took all evening!  I don't know if it was because I was tired, rubbish at wrapping ribbon around or just rubbish!

I used the infographic above to give me an idea on how to thread the cord through the hoop, and it was actually a lot easier than I thought it would be, even though my end result is not as neat, but it has the authentic look (that's what I'm going with anyway)!
making a dream catcher

Once the cord was threaded, we raided the jewellery making drawer and picked out some beads to hang with the feathers, and my son also spotted the Pandora style beads that he wanted in the middle of his catcher (?!).  After staring at the beads for 10 minutes, I realised I could just thread these through!

I tied some cord off the bottom of the ring and used the beads to hold the feathers in place.  I was going to glue these, but found the feather and cord were quite a snug fit, so I've left that... for now.

And that's basically it.   Until Max then found some coloured feathers in his craft box (honestly, I don't know how this stuff makes its way in my house...), so we added more feathers to the bottom, and I think it finishes the dream catcher off nicely!

What do you think?

making our own dream catcher

Most importantly, my son loves his new catcher (mainly because it's bigger than mine!) and so I get to keep my little one tucked up out the way of little hands, and Max gets to have his crazy, bright coloured one on full display in his room for him to hold, hang up and play with as much as he liked.

Hanging up the dream catcher in pride of place


Little Brian Paint Sticks Review

Review of Little Brian's Paint Sticks

We were given the opportunity recently to try out a new brand's painting product - Little Brian's Paint Sticks and below is a summary of what the Paint Sticks are and what we thought of the product.

What is Little Brian Paint Sticks?

Little Brian Paint Sticks provide a clean and convenient way to paint with no need for water or the mess that comes with it.  The solid paint sticks twist up and down, like a glue stick, and allow vivid colours to be transferred directly onto surfaces like canvas, wood, paper, card and even glass drying within minutes of use.


What we thought of Little Brian's Paint Sticks

These bold bright colours in short thick stick form are great for little fingers to wrap around and get a good grip onto, which, to be fair is what you want, seeing as at the end of the day - these are paints, and whilst there is minimal mess, we don't need them slipping out of tiny hands.
Little hands holding Little Brian Paint Sticks

I found these paints seem to go onto the mediums we used a bit like crayons, the way they roll and colour the card or shell in this instance, but as you look at the colour it is quite clear the effect paints and needs time to dry.

Pink Paint Sticks

green paint sticks

My son loves painting, and I don't restrict him from using his paints but it is a bit of an ordeal setting up the back room for him, by the time we've put the cover on the table, filled the pots up with paint, got the water, brushes and card out - he's lost interest and off building Lego!

So to have the paints out and in the front room no less, was a very excited son!

We had the painting cloth down and we only needed the sticks and various materials to paint on to set up.  This meant my son's attention span was still on painting, and if I'm honest, we sat and painted shells, cones, card, foam and polystyrene shapes for at least 45 minutes!

Prep time for paint sticks - minimal!

Prep time for paint sticks - minimal!

Little Brian pride themselves that "Paint Sticks are compactly packed and are ideal for handbags and travel bags and can be put away as easily as they are pulled out"  and they are spot on!  It took seconds to tidy up, no washing the brushes or pots, minimal washing for Max so we could move on to the next activities in no time.

These great little paints can be purchased from Amazon and independent stocks in both a six pack and twelve for just £4.99 and £7.25 respectively.

I'm really pleased with these great little products, a great way to enjoy painting without the mess.

Little Brian Paint Sticks


Little Brian have great paint sticks for youngsters as seen on RachaelJess.com


* Contains affiliate links

I received Paint Sticks to review.
The above wording is all my own and not influenced by products received.

Table top whiteboard / Chalkboard

Doodle Wall paint

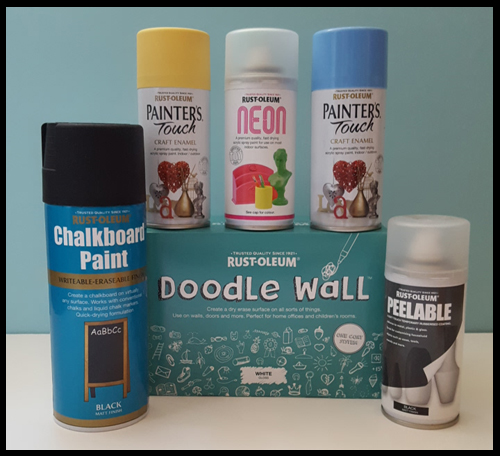
I wrote last month how we used some of the Rust-oleum paint products to create pen pots and the wonderful Bulbasaur Chalkboard, but we didn't stop there!  Carrying on with the learning and 'back to school' theme I used the Doodle Wall paint to create a new portable white and chalkboard.