When I made mypotting unit out of palletslast month, we cut the pallets to fit the area. As my unit was 7 pallets high, we had a large pile of cut-offs.
I love to learn, so when a course popped up in my email to learn pallet lettering with the one and only Salvage Sister Charis Williams - I was booked on it before you could say upcycle!
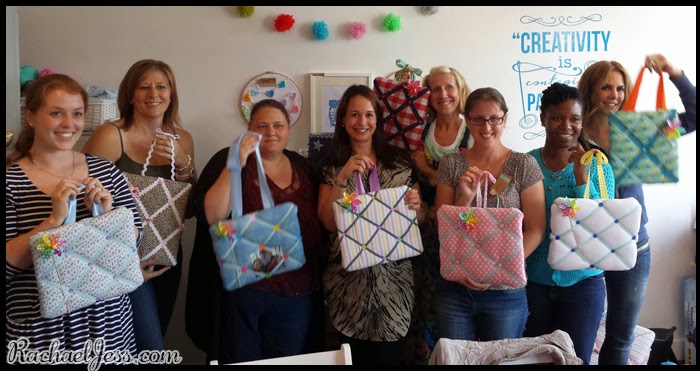
So, continuing on from this post our afternoon with Dry Nites and Tamara saw us creating pinboards. The idea behind this second project of the day is to create a unique space to hang mementoes of your child's fun memories, achievements and learning stages to help them feel like they are growing up.
The materials you will need are :
* Stretched Canvas
* Wadding or Foam
* 4 meters of elastic
* Split Pins
* Glue Gun (which many of us, we found out actually do have at home)
* Buttons
* Fabric
* Staple Gun (possibly my favourite tool)
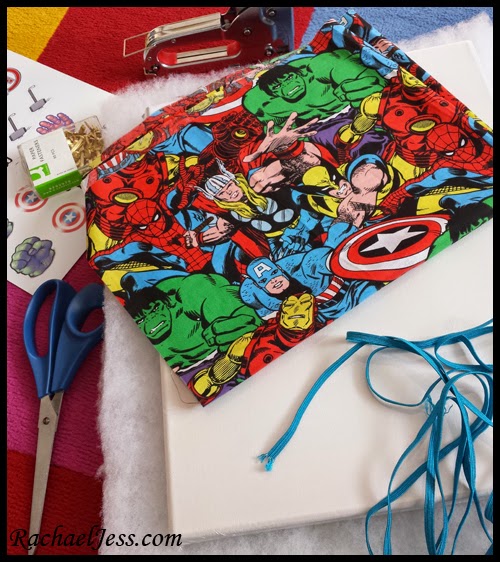
Cut the wadding to the same size of the canvas and then cut the fabric approximately 5cm larger than your base - we are aiming to stretch the material just over the wadding and canvas.
Once measured staple the material to the wood of the canvas. Start with the middle of each side and stretch the material across to keep it nice and tight. Work along the canvas evening out the tension trying to be as neat as possible.
Once complete this is also the process you can use to recover seats (as I did with my spider-man seat. stools and Toy Box).
Cut the elastic into 6 even strips and attach with your staple gun diagonally across your board creating a lattice.
The split pins are needed to secure where the elastic cross over. The best way to do this is to use an awl to create the hole for the pin to go through - but a scissor blade will also do the trick.
The pins can then be covered with buttons of your choice using your glue gun to keep them in place. Once dry you can then add a decorative ribbon to hang the board from.
You now have a 3D pinboard to hang in your child's room for them to add items to - even objects and toys can fit through these elastic sections.
As you can see from my material - it wasn't quite Max - so once I got home I sourced all the materials again and made him - Avengers of course!
I would like to thank the DryNites team for the advice on Potty Training and Bed Wetting, my fellow bloggers for the great day and company, Tamara, for sharing her amazing knowledge and Tea and Crafting of Camden for their supplies, knowledge and facilities.
I've had one of those "Can't be that hard surely" moments again!
I purchased a pair of cropped jeans from Next in their latest sale. I purchased the last pair in my size so when they turned up with the left pocket cut off, I was extremely disappointed.
After getting over the initial 'is this part of the design' thought, quickly followed by 'who does that'! I should have and very nearly returned the faulty jeans.... but they fit so well and were now out of stock!
Then, I had one of those mad moments. I love this material, I'll just add a pocket, it will be a good sewing exercise for me....
NO
This is not a good exercise for me, this very nearly got filed under - Never using the sewing machine again. What was I thinking!
First of all, I had to take the fixed, firmly sewn denim pocket off the right side, in one piece to use as a template.
Two days later............
Urgh, that was hard! Once I had the templates the pieces were pinned, tacked and then sewn.
And that my friends, was the easy part!
How on earth did I think I was going to get that tiny pocket sewn onto my jeans? No idea what the secret to this is, I'm yet to go on a sewing course so I totally winged it.
I took my time and carefully added these new pockets to my jeans, it was fiddly and not perfect but you know what..... I now get to wear my fabulous faulty jeans with a little added flair.
I'm rather looking forward to seeing these pockets glow in the dark!
I wrote a post last week on how we'd created a card game for my son's school fair this weekend. I know that is going to be a big hit, as it seems to do really well at other fates we've been too, but we also created a new hoopla game, which I hope does just as good.
Materials used to make a Smurf hoopla game
MDF- obtained from my local Freecycle page Smurfs- doubles from when McDonalds was issuing Smurfs Foam Ring Game - £6 from Asda Paint, Drill & Sander Smurf print outs Masking tape
How to make a Hoopla game, ideal for a school summer fate
I want the game to be played flat on the ground rather than standing upright so as not to worry about how to create a solid stand, as the MDF is quite weighty on its own, and I'd hate for the game to break or fall over at the school.
The board was cut into a good sized rectangle; I sanded the whole piece down and gave the board a coat of primer.
Once the paint was dry, the masking tape was added. I wanted stripes to give the board a little lift and used the blue paint I had from when I reupholstered my son's deckchair. It's because of the blue and white colours that the idea to use Smurfs as decoration was born.
I marked out the poles and the smurfs on the board and set about adding the holes in the board for the pegs and a nail in the foot of the smurfs. I used Gorilla glue as an extra hold for the pegs, and painted over the nail heads in each of the Smurfs' feet.
I printed off some Smurfs and add these around each of the pegs then covered the whole board with outdoor Mod Podge to protect the board against the elements.
I'm rather proud of the end result and do hope it goes down well at the school. My son loved it and was a real good sport about donating his Smurfs. Let's hope it does well on the day too.
With Christmas well and truly tucked away back in the loft, I was left with various tubs, jars and tins in the recycling bin, just waiting to be given a new lease of life.
Not all the items above got sprayed with my fabulous Metallic Copper paint, as I plan to decoupage the Heroes tin and the plastic blue bowl is not the right surface, but I was so pleased with how well the paint went on to my glass jars!
I'm liking the middle step and if the tape had gone on more smoothly I might have left the jars as they were! Good to know for future projects.
Some very quick and easy jars. The few materials used were Rust-oleum spray, marking tape, empty glass jars and a little bit of patience.
But my favourite piece that I decorated with leftover Christmas recycling items was the sweetie jar!
This is a great size plastic jar, which can hold quite a few smaller dinosaurs that usually get lost at the bottom of the toy boxes.
A quick transformation to the lid and a purchased dino from the local charity shop... (as my son knows exactly how many he has, and would not take kindly to me spray painting one!!), and we have a new storage pot.
I also touched up some pine cones and an old plant pot and the transformation is truly stunning.
I would recommend having a look around your home and see what needs touching up and just give it a go or, pop down to your local charity shop and have a good root around in the household section and visualise the products with a new lick of paint - and experiment.
You'll be surprised with how lovely your results will be.
Well, the sunshine has finally arrived and that means one thing in our household - garden projects!
With the help of the Ryobi grass trimmer, which is part of the ONE+ range, we were able to clear the grass around my son's playhouse. His daddy had hand built this last year and now we finally got round to adding the finishing touches to it - the door and interior and boy, does my son love it!
There are rumours afoot that the man of the house would like to run electricity up to the playhouse - I fear my son may lose this for a man cave, so I've decided to keep the boss man busy with more garden projects, the next being creating a potting station!
For this, we sourced 8 large pallets, accessories, and Ryobi ONE+ tools - this is where we can use the same battery for all the power tool needed saving on costs. The paint was leftover from the playhouse, so all in all, a very thrifty project to make.
Measuring out the pallets
The space I had for my potting station wasn't quite big enough for the depth of the pallets we had, so our first job was to saw the back section of the pallets off. For this, we used our One+ battery from the grass trimmer and placed on our Ryobi saw.
Measuring out the pallets for the space we have available
Just the right height for me :-)
Creating storage space
Once the pallets were in place we marked out which sections we wanted to cut out to give me storage space for my pots, compost bags and other equipment.
Marking out the sections for storage
All sections cut out ready to be painted
Creating the top section of the potting station
The back of my potting station is another pallet, the same depth as the others. The top, however, is the leftover section of one of the cut pallets - waste not want not with pallet projects!
Top shelf of the pallet station is a cut off section
Positioning and painting
Once all the sections were painted we moved the pallets into place. This is where some muscle definitely comes in handy as these pallets are a lot heavier than they look. Because of the weight of these pallets we haven't screwed the lower ones together, but we have for the top sections for security.
Making sure the potting station is in place, with a little helper!
Securing the potting station
Finishing touches
The stool my son is standing on - handmade from pallets. As for the tools - same battery, 2 power tools thanks to Ryobi's ONE+ battery fits all system.
Now, as lovely as my new potting station is, I couldn't help but give it some new gardening pieces, and to my delight, my local B&Q centre had a few plants and pots in their clearance section. With pieces from other supermarkets and TKMax, I think I have the most beautiful piece in the garden, and all made out of pallets!
My beautiful garden potting station created from pallets
With the right tools, imagination and some elbow grease, you can truly make some magnificent pieces for the garden and the home, and I for one, have a few more projects in mind (and on Pinterest)!
So quick update for my new readers - The lovely Alice runs a brilliant linky each week called....... Look in my Letterbox! I love it! As a blogger, comper and well nosey person really, I love seeing what others have received in the post and pick up tips along the way, be it penpals, freebies or opinions on reviews.
I try to contribute when I can and this week I wanted to share my rather fabulous letter holder that came .................
I know what you're thinking, and no, I don't get enough letters through the post to warrant a letter holder, even if it is a pretty fancy acrylic one..... but that's not what I bought it for ... but you must have known that if youread my posts.....
I got some washi tape and paper from my Docraft magazine to give the holder a little face lift and then added bulldog clips either side. The small clips hold the new style iPhone/iPad chargers nicely, whereas the larger clips are needed for the older style chargers and my Samsung products.
To my delight not only do the phones fit in this holder perfectly, so do the tablets; now I have a pretty, organised docking station for our phones and tablets.
So that's what came through this week. Did you receive anything lovely too?
This year my son is heavily into teenage mutant ninja turtles and so that set the theme for this year's party. As this is a 4th birthday party I thought it would be nice to add a few games to the mix, rather than just a bouncy castle and some tike cars.
I have a rather exciting new competition for my readers and it involves HobbyCraft! I know exciting right! The lovely people over at Bedroom Storage Makers want to know your top tips and tricks for upcycling or revamping your home.
For me, plain boring wooden storage boxes have the most potential, especially if old and dated as these can be covered in chalkboard paint, comic book pages or one of my favourites - Harry Potter pages and give you that new WOW factor again.
Do you have a clever use for old jam jars, toilet rolls or milk bottles? Here's how you could win £25 to spend at Hobbycraft:
Let me know your tips/tricks for upcycling or revamping your home. You can either:
Leave a comment on this blog post
Leave me a comment on this post on my Facebook page
Tweet me @RachaelJessBlog with #RJRevamp or
Drop me an email mail@Rachaeljess.com
Lots of choices but only 1 entry per person, please.
I will update this post with my favourite tips by 31st July, and from that list choose my overall favourite. That tip will then be added to Bedroom Storage Maker's blog and not only will you be credited for your tip but you will also receive a £25 Gift Voucher - how does that sound?
Look forward to reading your tips, good luck xoxo
My favourite tips from my readers : Cate:I upcycled some milk cartons and bottles in to this water wall for the kids Jennifer:My tip would be to use keep old clothes to make into new things. Baby clothes make gorgeous quilts... I still have the maternity dresses that I plan on using to make some nice dresses for my daughter. Esther: My tip is to salvage fabric squares from old clothes- baby clothes are nice as they have sentimental value, and upcycle them into new blankets and cushions Natasha:I love using toilet rolls in crafts. I have made some toilet roll kids candles, I have used them as seedling trays. But my favourite thing I have made with them was my toilet roll advent calendar. Jennie: My latest up-cycle project has been painting used car tyres with bright masonry paint and then stacking them up as plant fillers and birdbaths. I wish I had more vouchers, there were so many great tips, but my favourite thrifty up-cycling tip is:
I use old clothes to make cushions or toys for cats and
donate them to an animal sanctuary
Congratulations Jenni, you've won yourself £25 Hobbycraft voucher.
I have wanted to try making my own upcycled furniture for a while, but our first attempt didn't go too well so instead, I made a little wall herb garden from our pallets and I LOVE IT!!!
Gumtree is currently running a project to encourage people to breathe a new lease of life into their unwanted, dated or unloved items. The campaign is to coin National Upcycling Day on 24th June which will run alongside National Upcycling Week from 22nd - 25th June.
I recently obtained a little spice rack from my local free up page on Facebook and was very much hoping it would be the right size for my POPs, so when I got it home I was VERY pleased that it's a perfect fit for them!!
Spice Rack - a perfect size to home Funko's POP Vinyl
Obviously having a bare spice rack in a house that has random pieces of paper, paint and well nothing bare! I had a good rummage through my papers and found the perfect Gorjuss scrapping pack to act as a backing sheet and decided to go bold and use metallic - first for me!
Yes my favourite POP is in the picture
I gave the rack a quick sanding down and used B&Q's metallic effect paint spray. I really can't get to grips with paint pots and brushes.
And there we have it, a little sparkly spice rack. I could leave it like this, but I do believe it would benefit from a backing sheet.
Spiced up Spice Rack
Gorjuss scrapping paper
Once the rack was painted I did select half a dozen different sheets but went back to my original choice which was part of my Gorjuss pack. I just used UHU to glue the paper to the back of the shelving.
Prepping the back sheet.
My final POP Vinyl Shelf
Not only am I pleased with the result I'm really pleased that this shelving holds 6 POP! Great little space saver.